Small portable device - 6V battery operation
Suitable for teachers, lecturers, tourists' guides etc.
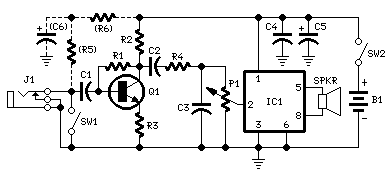
ircuit diagram:
P1______________22K Log. Potentiometer
R1_______________1M 1/4W Resistor
R2______________15K 1/4W Resistor
R3_____________470R 1/4W Resistor
R4______________47K 1/4W Resistor
R5,R6____________4K7 1/4W Resistors
(Optional, see Notes)
C1,C2,C4_______100nF 63V Polyester or Ceramic Capacitors
C3______________10nF 63V Polyester or Ceramic Capacitor
(See text)
C5_____________220µF 25V Electrolytic Capacitor
C6______________10µF 25V Electrolytic Capacitor
(Optional, see Notes)
Q1____________BC547 45V 100mA General purpose NPN Transistor
IC1_________TDA7052 Audio power amplifier IC
J1______________3mm or 6mm Mono Jack socket
SW1____________SPST Slider Switch fitted in the microphone
(Optional, see text)
SW2____________SPST Toggle or Slider Switch
SPKR______________4-8 Ohm Loudspeaker (See Notes)
B1_______________6V Battery (4 x AA or AAA 1.5V Cells in series
or any 6V rechargeable battery pack etc.)
Comments:
This circuit is intended to be placed in the same box containing the loudspeaker, forming a compact microphone amplifier primarily intended for speech reinforcement. A device of this kind is particularly suited to teachers, lecturers, tourists' guides, hostesses and anyone speaking in crowded, noisy environment.
The circuit's heart is formed by the TDA7052 Audio power amplifier IC, delivering a maximum output of 1.2W @ 6V supply. An external microphone must be plugged into J1, its signal being amplified by Q1 and fed to IC1. R1 acts as a volume control and C3 tailors the upper audio frequency band, mainly to reduce the microphone possibility of picking-up the loudspeaker output, causing a very undesirable and loud "howl", i.e. the well known Larsen effect.
Therefore, C3 value can be varied in the 4n7 - 22nF range to ensure the best compromise from speech tone quality and minimum Larsen effect occurrence. For the same reason, the use of an uni-directional (cardioid) dynamic or electret microphone is warmly recommended.
Most of these microphone types are usually fitted out with a slider switch: this is an useful feature that can be used to momentarily mute the microphone. Some microphone types use a separate jack for connection to the muting circuit, some others use a stereo jack or different plug types. In any case, the connection of this switch to the circuit is shown as SW1 in the diagram.
Notes:
* Please note that hands-free, uni-directional headset or earclip microphone types are very well suited for this device, as also are Clip-on Lavalier or Lapel microphones.
* If a small electret capsule is used for the microphone, R5, R6 and C6 must be added to the circuit to provide power supply.
* Choose a loudspeaker as large as possible, in order to increase circuit performance.
* You can use also two 4 Ohm loudspeakers wired in series or two 8 Ohm types wired in parallel in order to obtain better results.
* The box containing the amplifier and loudspeaker(s) can be fitted out with a belt and carried like a shoulder-bag or, if you build a smaller unit, it can be used as a Pick & Go Belt Clip Speaker.
|
|


0 comments:
Post a Comment